Saturday, May 26, 2012

Easy Apple Tarts


Every single person that has tried these tarts are shocked at how good they are.  I have made these over and over again for different occasions and they are always a hit and always gone at the end.  No leftovers.  Ever.  :(  They are simple, delicious, pretty and EASY!  I have served them at room temp off a platter like finger food.  I have served them hot with a scoop of ice cream and homemade caramel on top.  I have made them and made them and made them and they are just always a hit!  So here you go, a sure crowd pleaser.  This recipe is adapted from Food Network.


INGREDIENTS

1 package frozen puff pastry dough
6 Granny Smith apples
1 jar apricot or peach preserves, heated
3-6 tablespoons sugar
1 teaspoon cinnamon
juice of 1/2 a lemon
flour for rolling out dough

Preheat your oven to 400 degrees.


Defrost your puff pastry according to the directions on the box.  Now, if you're looking to make puff pastry by hand, well, you're crazy.  My sister loves to cook and loves the process of making things from scratch and decided she wanted to make her own puff pastry once upon a time ago.  It was literally hours of work for a result that tasted exactly like the frozen kind.  Skip the head ache, just use the store bought kind!

While your puff pastry is defrosting get your apples ready.  I have a handy-dandy apple peeler/corer/slicer.  Seriously, I LOVE it, and so do my kids.  It hooks onto the edge of my counter, you stick an apple into it, turn the crank and 3 seconds later I have this...
...a perfect apple spring (now you get why the kids love it).  I cut the spring in half and I have perfect apple crescents.  Amy M has a similar device that suction cups to her counter that I think she got from Bed, Bath and Beyond, (mine is a Pampered Chef product).  It really is a kitchen MUST-HAVE.

Into your apple slices squeeze your lemon half (don't skip this step, it's really just to keep your apples from browning after they are cut), and add your cinnamon and sugar.  I have a shaker with a mixture of both and I just gave the apples a few healthy shakes and stirred it all up.  Set your apples aside.

So, once the dough is ready to use dust your work surface and dough with flour and roll it out thin.  I like to get a lot of bang for my buck so I tend to roll it really thin to get more tarts, but if you leave it thicker the pastry will puff more.

Now let's cut the dough.  You have some options here.  I just eyeballed it and cut it into squares.  My sister (the same one who made the puff pastry from scratch) would get out the ruler and mark it and cut it perfectly (too much effort for me).  You can also cut it with a biscuit cutter to get perfect circles.  Very pretty, but I hate to see that extra dough go to waste.

I like to move the cut dough onto cookie sheets lined with parchment paper for the rest of the project.  It's less mess and goes quicker.  Trust me, when the sugar in the jam warms up and crystallizes on your pan, you'll be glad you don't have to scrub it off.  Grab your bottle of preserves and warm that sucker up.  Then you're just going to spoon about 1-2 teaspoons of warm preserves onto each square...

And spread it around with the spoon.

Next top with your apple slices.  Don't overlap them, it messes with the baking time.  Bake them at 400 degrees for 15-20 minutes.  They can cool on the pan and be served at room temp or serve them warm.

Easy Apple Tarts


 DELISH!!!
<3, Sharla

Peanut Butter Chip Chewy Chocolate Cookies
(right?!)


Ok, these are, bar none, one of my favorite cookies in the world.  It's obvious because I will make a batch just for myself (I have a house full of peanut butter non-lovers).  But for those of us who are not crazy, these really scratch the salty/sweet itch.  But you have to promise me that when you make these you will only eat them fresh and warm out of the oven or warmed up in the microwave.  Those peanut butter chips have to be gooey in order to really experience the joy of these cookies.  This recipe is adapted from the recipe on the back of the Reese's Peanut Butter Chip bag.


INGREDIENTS

1 1/4 cups (2-1/2 sticks) butter, softened
1 cup granulated sugar
1 cup brown sugar
2 eggs
2 teaspoons vanilla
2 cups all-purpose flour
3/4 cup unsweetened powdered cocoa
1 teaspoon baking soda
1/2 teaspoon salt
1 bag (1-2/3 cups) peanut butter chips

Preheat oven to 350 degrees.

In the bowl of an electric mixer cream butter and both sugars together until light and fluffy.  Add eggs one at a time, mix well.  Add vanilla, mix well.

Meanwhile, in a large bowl stir together flour, cocoa, baking soda and salt.  

Add dry ingredients to wet 1/3 at a time, mixing well after each addition.

Mix in peanut butter chips by hand.

Drop by rounded teaspoons onto ungreased cookie sheet.  Bake 8 to 9 minutes (Do not over bake; cookies will  be soft).  Cool slightly, remove from cookie sheet and CHOW DOWN!  Makes about 4 dozen.

OR you can make these into bars by spreading the batter onto a greased 15-1/2 x 10-1/2 inch jelly-roll pan.  Bake at 350 for 20 minutes or until set.  Cool completely in pan.  

HELPFUL HINTS - I already covered eating them warm and not over baking, but it's also important to freeze these over night for storage.  I don't know if it's all the butter or what, but if they sit on the counter over night (even if they're in an air tight container) they are stale the next day.  

Chewy Peanut Butter Chip Cookies
P.S. Your welcome ;)
<3, Sharla

Friday, May 4, 2012

It's Grilling Season!

I am so excited that the season has finally come to clean off the grill, stop using the oven and get outside!  I am serious about grilling, so much so that I have a built in grill (I've been known to grill with snow on the ground).  It's healthy, fast, yummy and seriously cuts down on clean up.  

So, this recipe has been kicked around in my family since we were kids.  My twin, Sharma, and I have done some serious tinkering with it and we feel we have reached perfection.  It's Sesame Seed Chicken, and you're going to love it!


Sesame Seed Chicken
The Recipe...

4-6 Boneless skinless chicken breasts or your choice of fish
1/2 cup honey, heated
1/2 cup soy sauce
2 tablespoons rice wine vinegar
1 teaspoon sesame seed oil
1 finger ginger, pealed and sliced
1 garlic clove, minced
3-4 healthy shakes from your sesame seed shaker

The technique...

First things first, put your chicken breasts in a large bag and add all of the ingredients.  I love to marinate in a bag, it's clean and easy.  I actually put the breasts in frozen, added all the ingredients and then let the chicken defrost in the marinade.  Let marinate 8 hours or over night.  If you're doing fish only marinate 30 minutes.

When you're ready to cook don't dump your marinade down the sink!  Pour it into a sauce pan and bring to a simmer while you cook the chicken.  You don't need to add anything, just cook it and it's fantastic as a sauce.

Now for the awesome part, the grilling.  You are about to be let in on the grilling chicken secret to perfect breasts (hee hee).  I'm pretty sure this technique came from Food Network, but I don't know by who.  Preheat your grill to high then scrape and clean it off.  Turn the heat to medium and give it a few minutes to adjust.  Place your breasts on all going the same direction then set the timer for 2 minutes.  I cut my breasts in half because they were huge, so they look more like giant chicken tenders.  The hot grill will give you a nice seared line, and at the end of the two minutes do you flip it?  NO!

You turn the breasts 1/4 of a turn and keep grilling them on the same side another 2 minutes.  When you flip it, they will look like this...

So pretty!  Now you're going to do the same thing on the other side.  2 minutes, turn a 1/4 of a turn and cook another 2 minutes.  Now check the internal temp of the chicken.  You want it to be 180 degrees.  I usually have to cook an additional 2-4 minutes to reach that temp.  When they're done, pull them off and tent with foil until you're ready to serve.  Now, let's go back to the sauce...

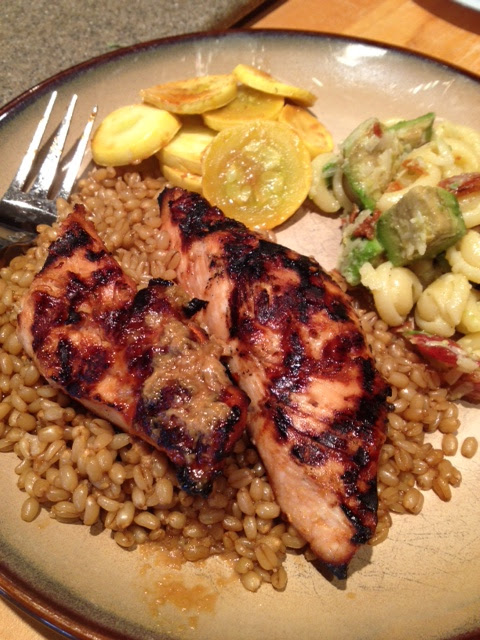
Once it's had a chance to simmer you can either just spoon it over the chicken and rice and/or I sliced yellow squash, brushed it on top and then broiled it.  It is a very delicious and sweet taste for veggies.

Grilled Chicken

I actually served mine over wheat bulgur. with the squash and a pasta salad.  This will not be the last time I make this recipe this season.  ENJOY!

<3, Sharla